| 일 | 월 | 화 | 수 | 목 | 금 | 토 |
|---|---|---|---|---|---|---|
| 1 | 2 | 3 | ||||
| 4 | 5 | 6 | 7 | 8 | 9 | 10 |
| 11 | 12 | 13 | 14 | 15 | 16 | 17 |
| 18 | 19 | 20 | 21 | 22 | 23 | 24 |
| 25 | 26 | 27 | 28 | 29 | 30 | 31 |
Tags
- 깃
- Di
- MVVM
- 유닛테스트
- dagger2
- Observable
- ViewModel
- Python
- 안드로이드 디자인패턴
- 파이썬
- 공격적 프로그래밍
- git
- UnitTest
- 컴포즈
- 안정성
- mock
- 자료구조
- Room
- 단위테스트
- rxjava
- Kotlin
- 코틀린
- 제한함수
- Jetpack
- 테스트의 장점
- 디자인패턴
- compose
- 코딩테스트
- 안드로이드
- Android
Archives
- Today
- Total
세상을 바꾸는 개발자
[Android, Room, Coroutinnes, DataBinding, LiveData, ViewModel ] 안드로이드 JetPack과 MVVM 패턴 사용해보기(5 - 3 : ViewModel을 만들어서 CRUD 해보기) 본문
안드로이드/Kotlin
[Android, Room, Coroutinnes, DataBinding, LiveData, ViewModel ] 안드로이드 JetPack과 MVVM 패턴 사용해보기(5 - 3 : ViewModel을 만들어서 CRUD 해보기)
헬창코딩 2021. 6. 18. 22:25안녕하세요 헬창코딩입니다.
이번에는 3번째 시간으로 앞서 만든 데이터베이스를 이용해서 CRUD를 수행해보겠습니다.
그렇게 하기위해서는 사용자에게 보여질 UI와 ViewModel을 만들어줘야합니다.
1. 먼저 사용자에게 보여줄 레이아웃을 만들어 줍니다.
activity_main.xml

|
1
2
3
4
5
6
7
8
9
10
11
12
13
14
15
16
17
18
19
20
21
22
23
24
25
26
27
28
29
30
31
32
33
34
35
36
37
38
39
40
41
42
43
44
45
46
47
48
49
50
51
52
53
54
55
56
57
58
|
<?xml version="1.0" encoding="utf-8"?>
<LinearLayout xmlns:android="http://schemas.android.com/apk/res/android"
xmlns:app="http://schemas.android.com/apk/res-auto"
xmlns:tools="http://schemas.android.com/tools"
android:layout_width="match_parent"
android:layout_height="match_parent"
android:orientation="vertical"
tools:context=".MainActivity">
<EditText
android:id="@+id/name_text"
android:layout_width="match_parent"
android:layout_height="wrap_content"
android:layout_margin="20dp"
android:hint="이름" />
<EditText
android:id="@+id/email_text"
android:layout_width="match_parent"
android:layout_height="wrap_content"
android:layout_marginHorizontal="20dp"
android:hint="이메일" />
<LinearLayout
android:layout_width="match_parent"
android:layout_height="wrap_content"
android:layout_marginHorizontal="20dp"
android:orientation="horizontal"
android:weightSum="2">
<Button
android:id="@+id/save_or_update_button"
android:layout_width="wrap_content"
android:layout_height="wrap_content"
android:layout_weight="1"
android:textSize="15dp" />
<Button
android:id="@+id/clear_all_or_delete_button"
android:layout_width="wrap_content"
android:layout_height="wrap_content"
android:layout_marginLeft="5dp"
android:layout_weight="1"
android:textSize="15dp"
/>
</LinearLayout>
<androidx.recyclerview.widget.RecyclerView
android:id="@+id/user_recyclerView"
android:layout_width="match_parent"
android:layout_height="wrap_content"
android:layout_margin="20dp" />
</LinearLayout>
|
cs |
2. UI를 만들어줬다면 UI를 컨트롤 할 ViewModel을 만들어줘야합니다.
2.1 DB 패키지에 UserViewModel.kt 클래스를 생성합니다.
2.2 ViewModel을 상속받습니다.
2.3 ViewModel 안에 사용할 LiveData 변수들을 선언해줌니다. (name, mail)
2.4 activty_main.xml 와 데이터 바인딩을 해줌니다.
UserViewModel.kt

|
1
2
3
4
5
6
7
8
9
10
11
12
13
14
15
16
17
18
19
20
21
22
23
24
25
26
27
28
29
30
31
32
33
34
35
36
37
38
39
40
41
42
43
44
45
46
47
48
49
50
51
52
53
54
55
56
57
58
59
60
61
62
63
64
65
|
class UserViewModel(private val repository: UserRepository) : ViewModel(), Observable {
var users = repository.users
@Bindable
val inputName = MutableLiveData<String>()
@Bindable
val inputEmail = MutableLiveData<String>()
@Bindable
val saveOrUpdateButtonText = MutableLiveData<String>()
@Bindable
val clearAllOrDeleteButtonText = MutableLiveData<String>()
//처음 초기화
init {
saveOrUpdateButtonText.value = "저장"
clearAllOrDeleteButtonText.value = "삭제"
}
fun saveOrUpdate() {
val name = inputName.value!!
val email = inputEmail.value!!
insert(User(0, name, email))
inputName.value = ""
inputEmail.value = ""
}
fun clearAllOrDelete() {
clearAll()
}
fun insert(user: User) = viewModelScope.launch {
repository.insert(user)
}
fun update(user: User) = viewModelScope.launch {
repository.update(user)
}
fun delete(user: User) = viewModelScope.launch {
repository.delete(user)
}
fun clearAll(): Job = viewModelScope.launch {
repository.deleteAll()
}
override fun addOnPropertyChangedCallback(callback: Observable.OnPropertyChangedCallback?) {
}
override fun removeOnPropertyChangedCallback(callback: Observable.OnPropertyChangedCallback?) {
}
}
|
cs |
activity_main.xml
|
1
2
3
4
5
6
7
8
9
10
11
12
13
14
15
16
17
18
19
20
21
22
23
24
25
26
27
28
29
30
31
32
33
34
35
36
37
38
39
40
41
42
43
44
45
46
47
48
49
50
51
52
53
54
55
56
57
58
59
60
61
62
63
64
65
66
67
68
69
70
71
72
73
74
75
|
<?xml version="1.0" encoding="utf-8"?>
<layout xmlns:android="http://schemas.android.com/apk/res/android"
xmlns:app="http://schemas.android.com/apk/res-auto"
xmlns:tools="http://schemas.android.com/tools">
<data>
<variable
name="myViewModel"
type="com.redate.healchang_mvvm.UserViewModel" />
</data>
<LinearLayout
android:layout_width="match_parent"
android:layout_height="match_parent"
android:orientation="vertical"
tools:context=".MainActivity">
<EditText
android:id="@+id/name_text"
android:layout_width="match_parent"
android:layout_height="wrap_content"
android:layout_margin="20dp"
android:hint="이름"
android:text="@={myViewModel.inputName}" />
<EditText
android:id="@+id/email_text"
android:layout_width="match_parent"
android:layout_height="wrap_content"
android:layout_marginHorizontal="20dp"
android:hint="이메일"
android:text="@={myViewModel.inputEmail}" />
<LinearLayout
android:layout_width="match_parent"
android:layout_height="wrap_content"
android:layout_marginHorizontal="20dp"
android:orientation="horizontal"
android:weightSum="2">
<Button
android:id="@+id/save_or_update_button"
android:layout_width="wrap_content"
android:layout_height="wrap_content"
android:layout_weight="1"
android:onClick="@{()->myViewModel.saveOrUpdate()}"
android:text="@={myViewModel.saveOrUpdateButtonText}"
android:textSize="15dp" />
<Button
android:id="@+id/clear_all_or_delete_button"
android:layout_width="wrap_content"
android:layout_height="wrap_content"
android:layout_marginLeft="5dp"
android:layout_weight="1"
android:onClick="@{()->myViewModel.clearAllOrDelete()}"
android:text="@={myViewModel.clearAllOrDeleteButtonText}"
android:textSize="15dp"
/>
</LinearLayout>
<androidx.recyclerview.widget.RecyclerView
android:id="@+id/user_recyclerView"
android:layout_width="match_parent"
android:layout_height="wrap_content"
android:layout_margin="20dp" />
</LinearLayout>
</layout>
|
cs |
3. 다음으로 UserViewModelFactory를 만들어 줍니다.
UserViewModelFactory.kt

|
1
2
3
4
5
6
7
8
|
class UserViewModelFactory(private val repository: UserRepository) : ViewModelProvider.Factory {
override fun <T : ViewModel?> create(modelClass: Class<T>): T {
if (modelClass.isAssignableFrom(UserViewModel::class.java)) {
return UserViewModel(repository) as T
}
throw IllegalArgumentException("Unknown View Model class")
}
}
|
cs |
4. MainActivity에 onCreate에서 지금까지 만들어준 클래스들을 선언합니다.
MainActivity.kt

|
1
2
3
4
5
6
7
8
9
10
11
12
13
14
15
16
17
18
19
20
21
22
23
24
25
26
27
28
29
|
class MainActivity : AppCompatActivity() {
private lateinit var binding: ActivityMainBinding
private lateinit var userViewModel: UserViewModel
override fun onCreate(savedInstanceState: Bundle?) {
super.onCreate(savedInstanceState)
binding = DataBindingUtil.setContentView(this, R.layout.activity_main)
val dao: UserDAO = UserDatabase.getInstance(application).userDAO
val repository = UserRepository(dao)
val factory = UserViewModelFactory(repository)
userViewModel = ViewModelProvider(this, factory).get(UserViewModel::class.java)
binding.myViewModel = userViewModel
binding.lifecycleOwner = this
displayUserList()
}
private fun displayUserList() {
userViewModel.users.observe(this, Observer {
Log.d("healcang_Tag", it.toString())
})
}
}
|
cs |
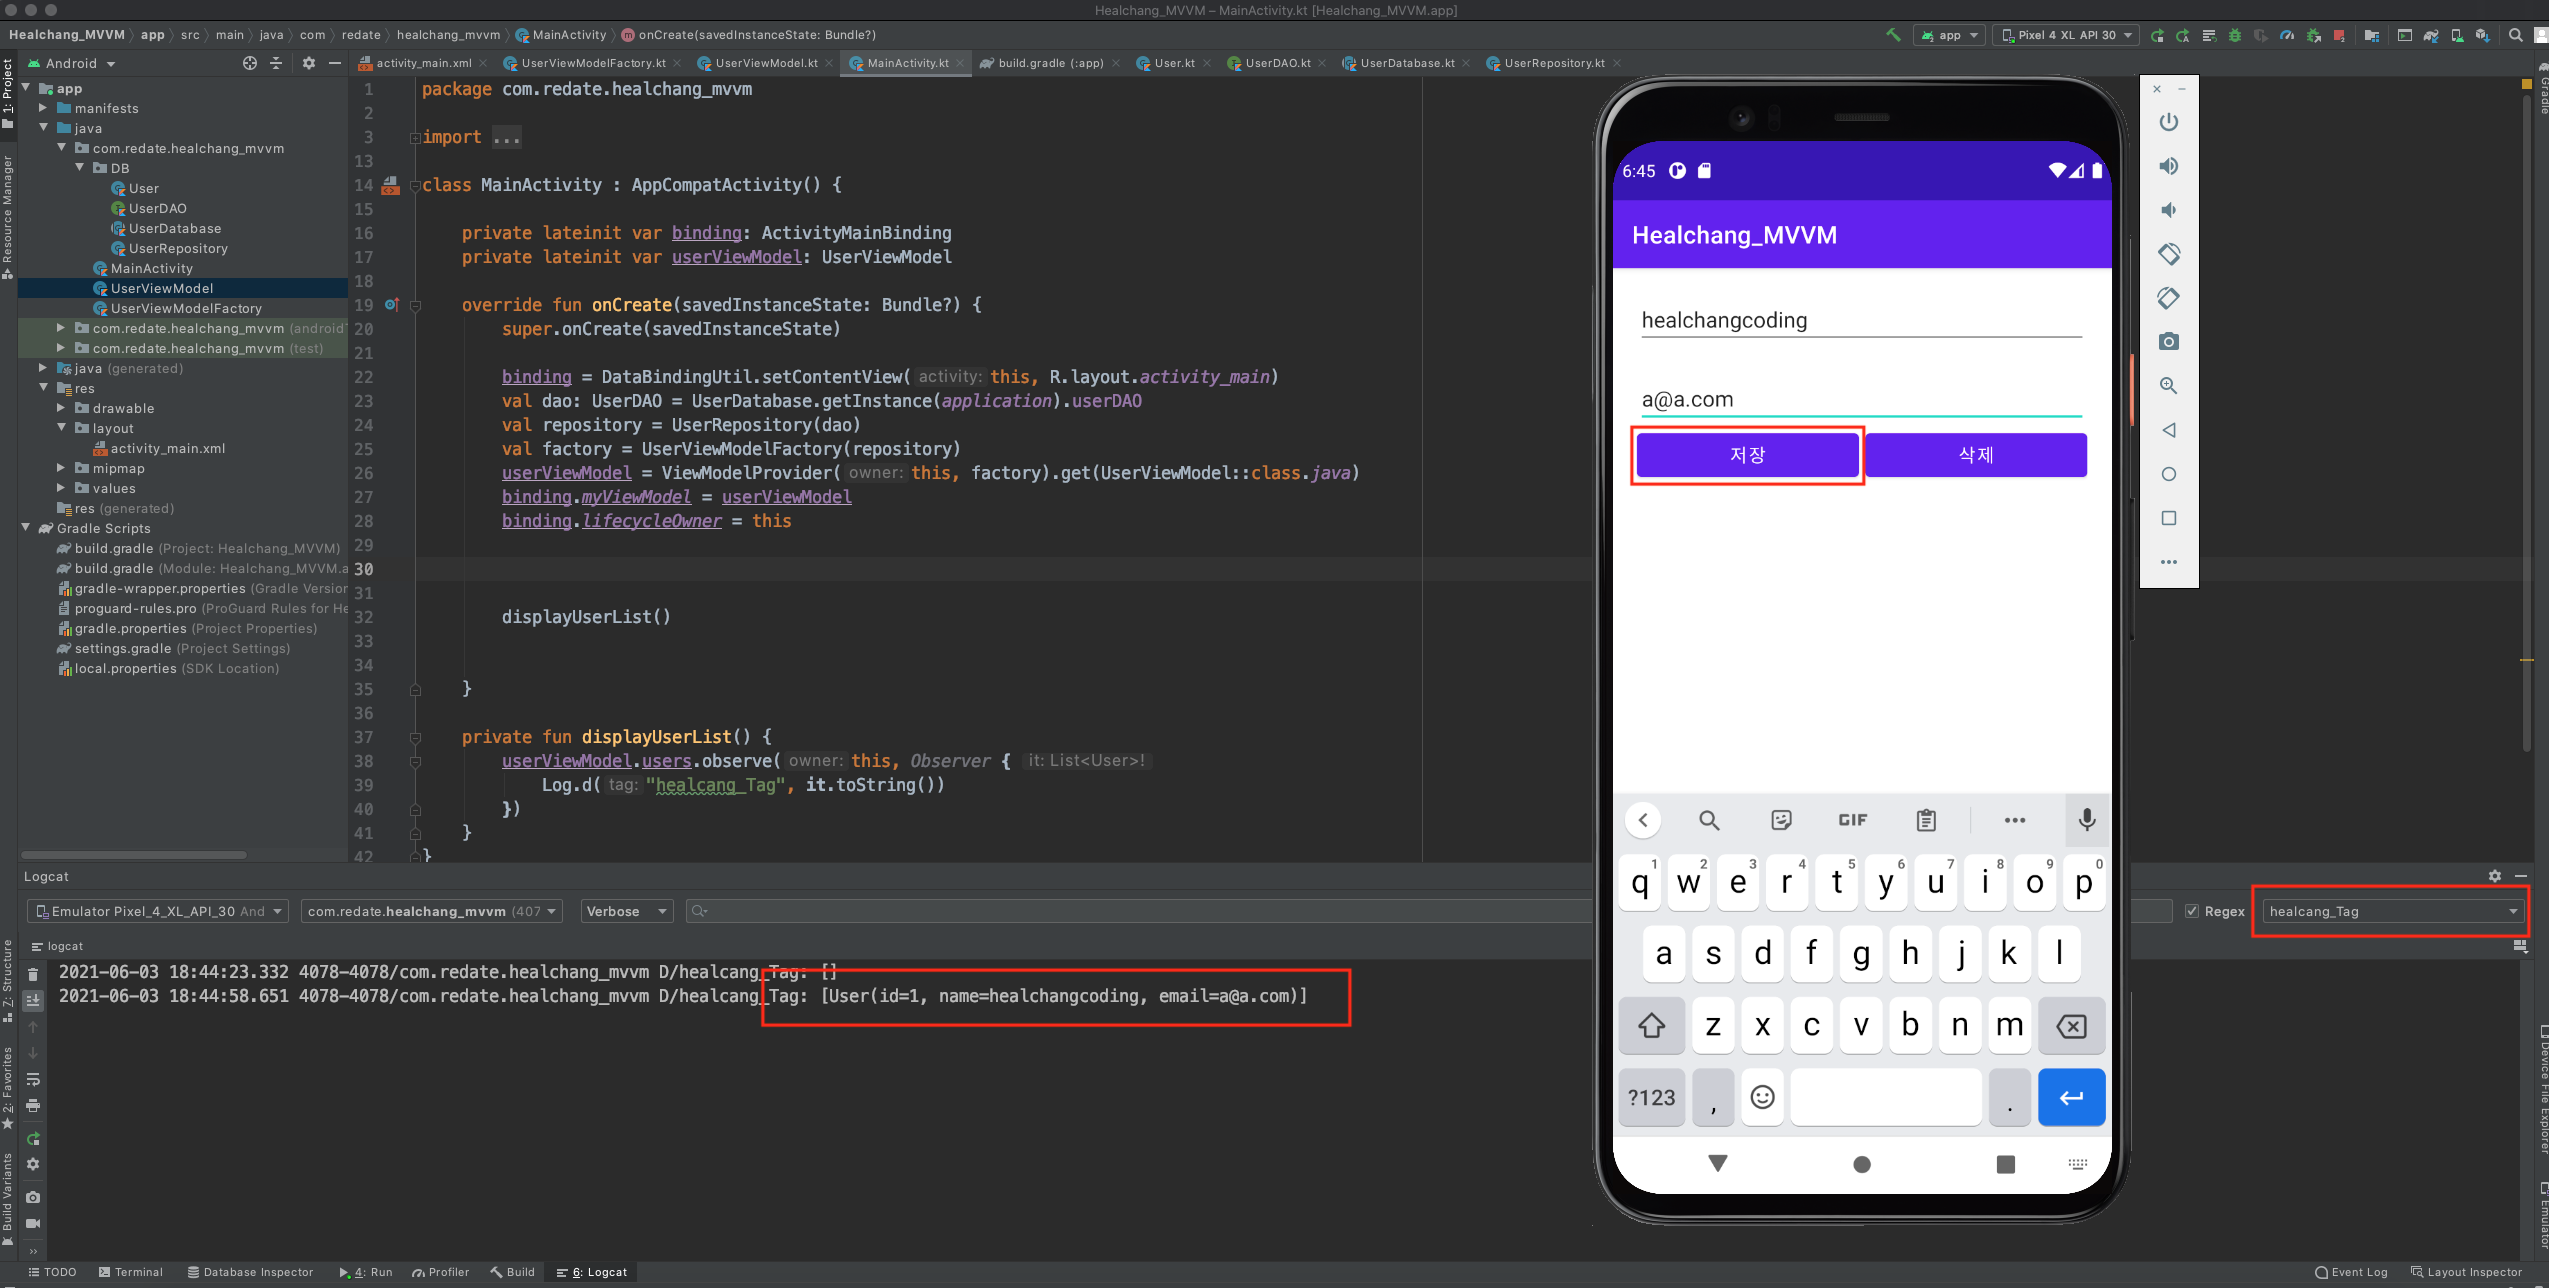
5. 이제 데이터가 잘 저장되는지 테스트를 해보겠습니다.
5.1 안드로이드스튜디오에서 애뮬레이터를 실행합니다.
5.2 만들어진 앱을 컴파일합니다.
5.3 이름과 이메일을 입력을 하고 저장버튼을 클릭합니다.
5.4 로그를 찍어서데이터가 잘 저장되는지 확인합니다.

이번시간에는 데이터를 저장해봤습니다.
다음시간에는 RUD와 리스트를 구현해보겠습니다~
'안드로이드 > Kotlin' 카테고리의 다른 글
Comments


